

Steampunk Hat Making Projects
Hats 1, 2 & 3.
The Project.
Hats cost a great deal of money and well made elaborate hats which we are all so fond of are very expensive, but at the core of steampunk we are makers not consumers, creators not buyers. We can do more than just punk up hats we buy, we can make them.
I challenged myself to build these hats, as far as I could, without buying anything new for the project. By that I mean if it was going to be scratch built then I would build it – as far as I could - from materials I already have around the house.
Now, like me, you probably have a lot of stuff, ‘resources or just junk, around your house. And it’s fatal to start a new project by buying new materials. This project sees a way to use up some of the accumulated kipple that our cupboards are full of.
Making a Steampunk Czapka
Hat Project 1


Inspiration
I have this fantastic Hussar’s Pelisse, which I’ve blinged up a little more. I know, but when can you have enough bling? And I’d love a hat to wear with it.
So, I woke up on Monday morning after having a dream about making hats and thought…I’ll make a hat. Partly my inspiration had to come from Marcus Brookes and that amazing Grenadier Guards Busby he made.

I've made a few hats before but nothing truly ambitious.


The Csákó looked easy enough to make, I foolishly thought, but I wanted something historically-themed but outlandish, and something that would easily be adapted to Steampunk. So, I looked at other regiments and came across the lancer's hat, the ‘Czapka.’


This looks amazing, it’s impressive, and could easily be decorated in a Steampunk Style. After all, look at what Steamers do with top hats and stove pipes; this was the one I wanted to try to build.
However, the shape was a nightmare and I could not find any making instructions anywhere. The nearest thing was this illustration.

Part One; The Build.
I couldn't build this from a pattern as I could not find one on the internet. So this would require a degree or trial and error.
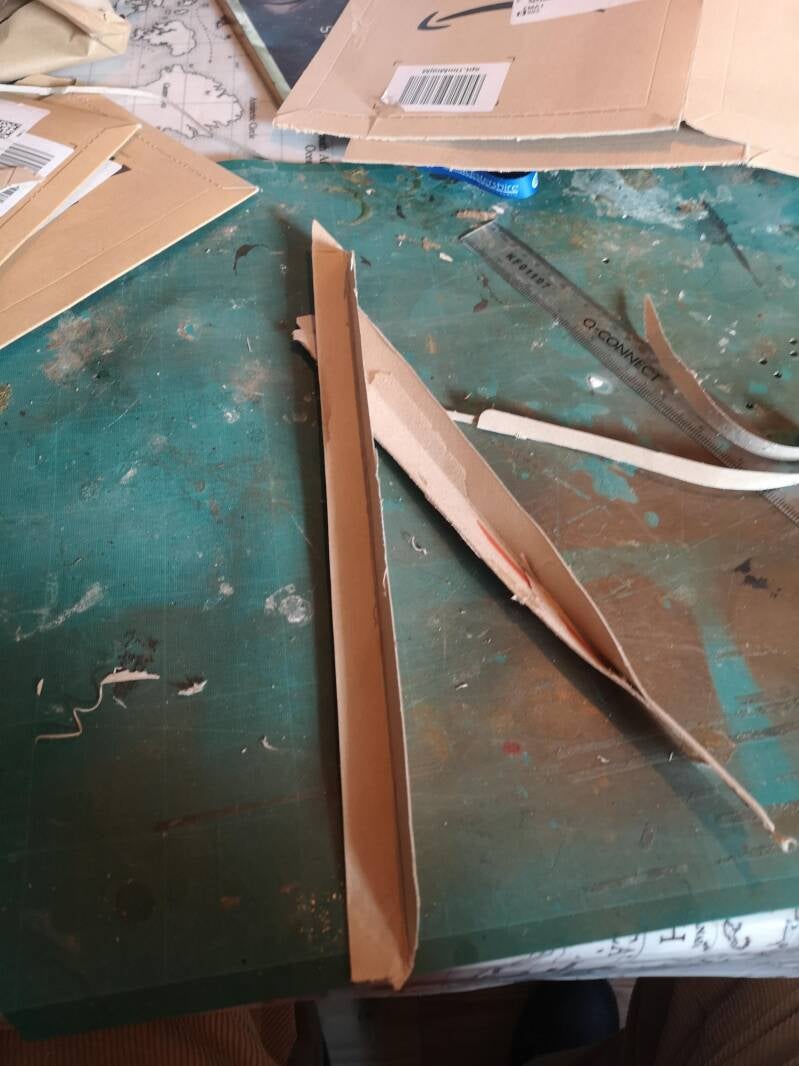
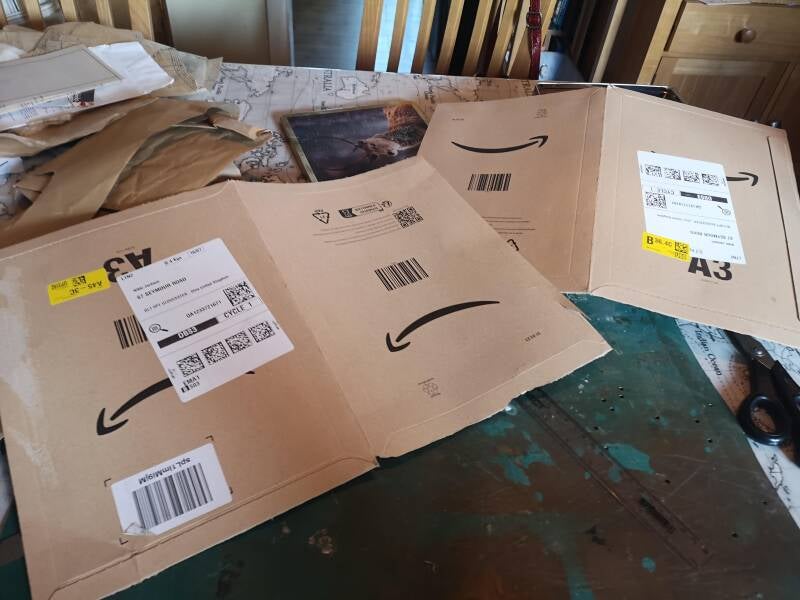
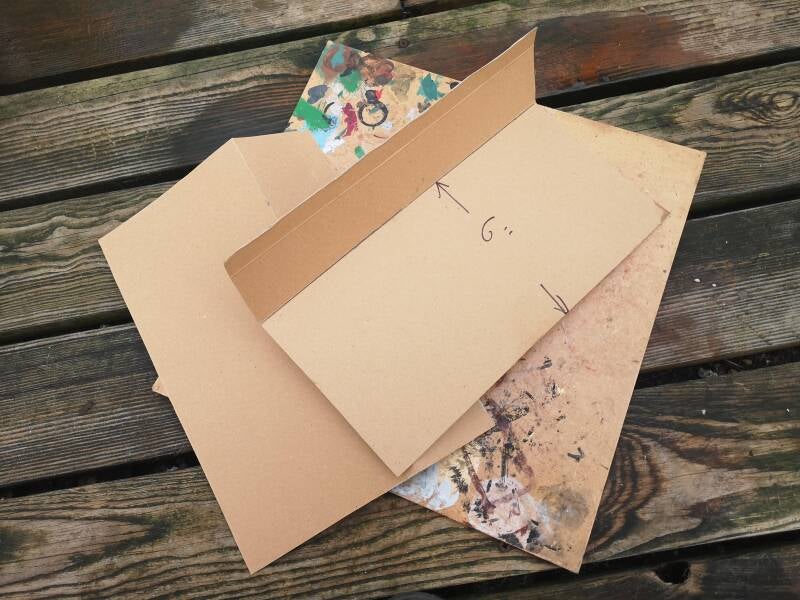
Firstly, I decided that I would build the base out of card, this would make it flexible, light, and can be strengthened. I needed a strong card but light and thin, not corrugated. The best stuff I found was old Amazon card envelopes. Two large and two small. I put the small ones aside to use late.
The large ones I trimmed them so I could get an idea of the ‘meat’ of the materials. I ended up with four large panels and some edging strips.

Firstly, I had to think about the size of my head. Standard measurements would not work for me as I am dyslexic and dyscalculic and libel to get confused. As I am using up personal resources, I cannot afford to waste materials on mistakes. So, to get a correct measurement of my head I folded the leftover edging strips, taped them together, and wrapped them around my head. Marking where they overlapped.
(Use heavy-duty masking tape. * You will need to PVA over taped areas later and Sellotape will come off when wet.)
This gave me an exact measurement of the circumference of my head.
The Czapka has four panels. So simply divide the measurement by four.

Now the Czapka has a distinct fluted shape and is wider at the top than the bottom.
As I had no plans to go on and was working on guesswork and instinct only, I had to build a maquette to get the angels right.


I went for a gentle curve, but at this point, I could have exaggerated the curve or made the top much wider than the bottom. I guess it’s a matter of taste. So long as the lower sections of the panels are equal to a quarter of the circumference, you can go for it.
Once I had the curve the maquette looked right. I cut the four panels that would form the actual body of the Czapka. Also cut a fifth, as a template for cutting leather and fabric later.


I didn’t allow for folding tabs on the pieces. You could, but I have found them annoying and problematic in the past. But if you use them, make sure they are small as they may interfere with the curve of the lines. I preferred to tape* the joints together on the outside.
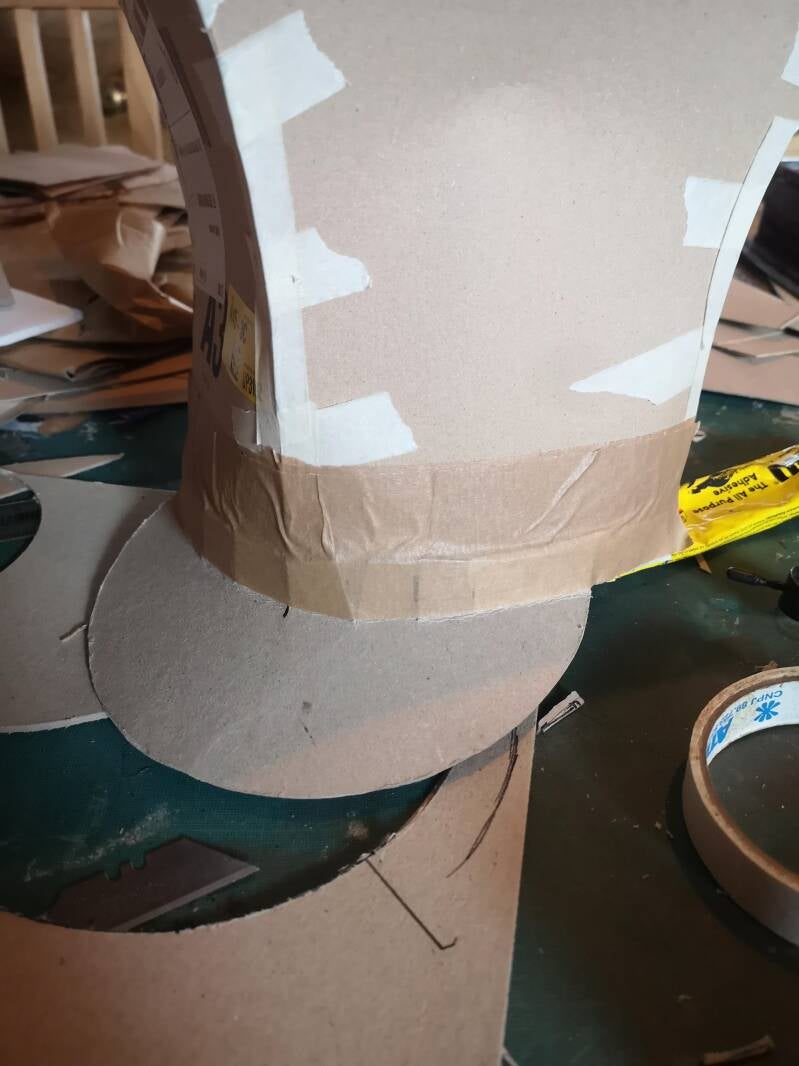
Then, slide the bottom section into the folded edging strips to form the hat brim. Tape it all together.


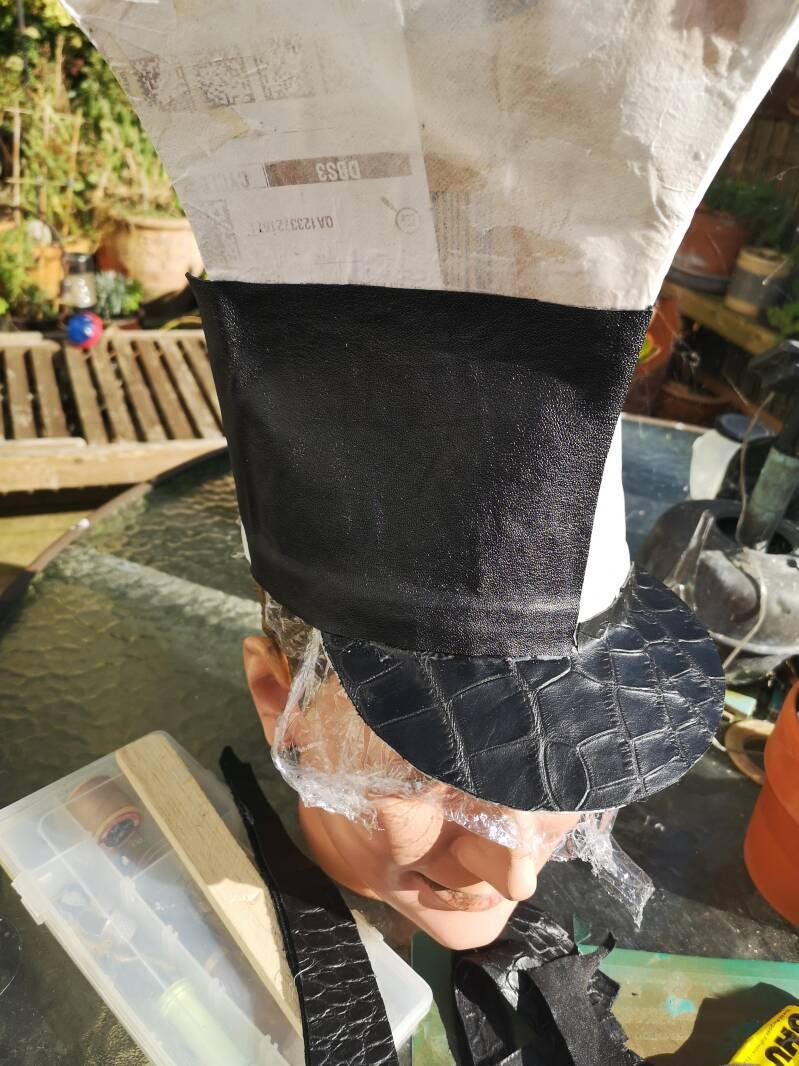
You now have the basic form of your Czapka. It’s light, but flexible to the point of flimsy. I was lucky because I had Fred, the head of a manikin that I was working on, that was the ideal fit for this. You could use anything to hand, including a balloon, husband or wife, or child, as a forma, unless you are lucky enough to have a hat block.
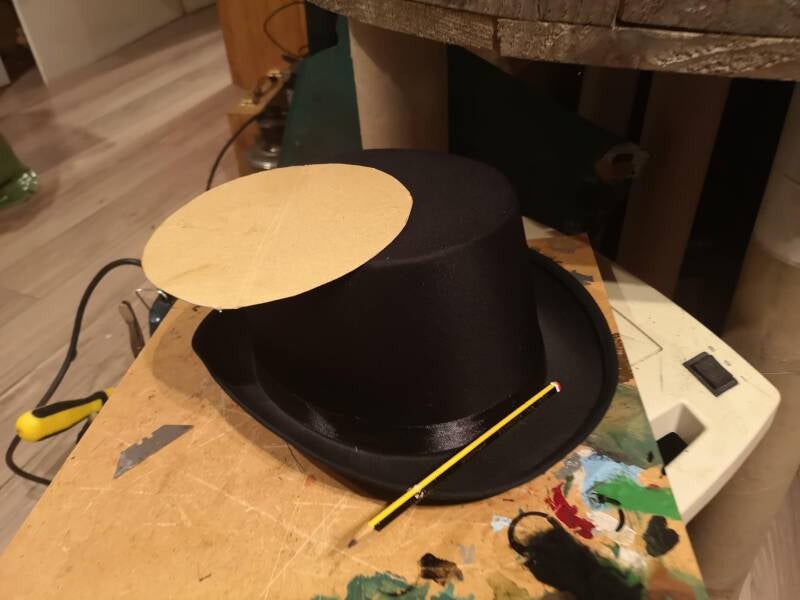
To strengthen the structure the Czapka needed a top. This needed to be stronger than the side panels but also light. I didn’t want to use corrugated card as it would probably bend, it is only really strong in one direction and could delaminate in the making process. Searching the cupboards I found a piece of art board, the stuff which had a layer of form between two layers of thin card. Ideal! And it was just big enough.
Placed on the manikin’s head and pushed down gently, the overall shape of the Czapka almost moulded itself.
I cut a peek from some thicker card and left on some tabs. This I taped on to the brim using framer’s paper tape, because it was thicker and very sticky, I also PVAed it.
Having the top and the peak in place gave the form some additional strength.
I suppose if you were just knocking something up for a fancy-dress party, you could stop there and just cover it with whatever fabric you wanted or glue on some fancy wallpaper, and it would be enough to survive a night out, school play or Christmas bash.
However, I want this to be a hat I can use, reuse and be proud of, Also I’m very clumsy, so it needs to be tough. Another layer was required to hold it all together, add strength and also help mould it permanently.


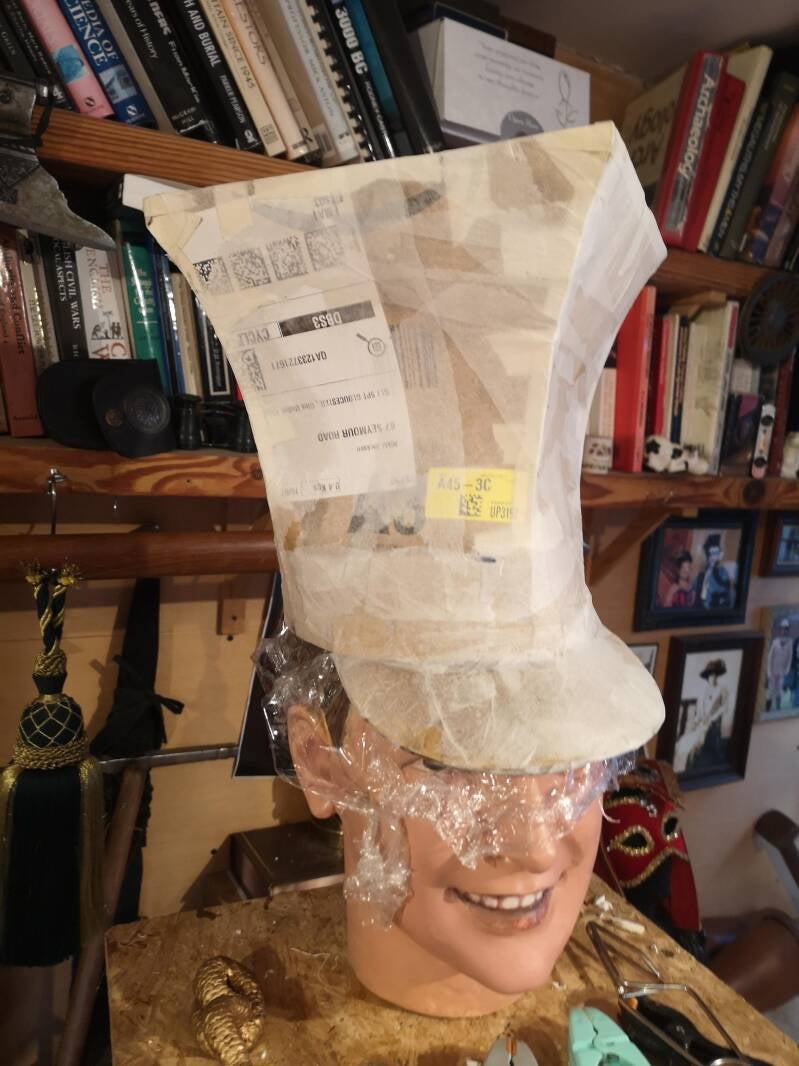
I used paper mâché. No not like you did at school. I have a lot of ‘teabag paper’ left over from the project I did for Westgate Street in Gloucester. If you don’t have ‘tea bag’ paper, you could use a good two or three-ply paper towel, separate the layers and laminate them. Another great paper mâché material is the packing paper Amazon uses in boxes. The stuff is absorbent, dip it in the watered PVA and laminate it on, it dries rock hard. And they usually stuff loads of it in their boxes (Makes great brown paper wrapping paper too).
And I have a large container of “washable” PVA glue. Water the glue down a little and apply the paper to the surface, then brush on the PVA. This is laminated over the card form, seams, tape, and all, in several layers. Make sure you pay particular attention to the seams and joints. I would recommend that you tear or cut the paper into smaller sections don’t try to cover large areas with one sheet. It gets messy and the paper mâché gets rucked up.
Also, once the paper mâché is down you may have to smooth it with your fingers to get rid of bubbles or folds.

I was lucky as this was during the hottest days of the year, so I could do it outside and the stuff was drying almost as quickly as I did it. You might need a hair dryer.
Remember to do the underside of the brim, and fold over the paper mâché to the inside so it provides a continuous area of strengthening.
Now you will notice that as the watered-down PVA goes on the card underneath becomes much more mailable. This is when you can get your best fit and shape it further. Once it is dry it will hold that shape, but it will also be rock hard. I put on about four layers of paper mâché over the whole thing.
Once I knew all the joints were sealed, and the outside was dry, I poured some PVA inside the hat and ran it about to seal all the joints from the inside. I also put some paper mâché over the inside seams and around the inside brim.
Let it dry thoroughly.
At this point examine the hat for malformations or distortions. Is the brim straight? Any dents or odd folds? I had an odd dent appear halfway up the front seam.
The reason you will find distortions is that you are making the card distort across several planes when the fibres in it were made to lay flat.
I used a piece of balsa wood as a brace and some thick card coated with epoxy glue to push out the dent from the inside. This also strengthened the area on the inside.
Now you have a hat. It’s tough and it fits.
But you need to do something with it. You could paint it or decoupage it, cover it with wallpaper, anything.
I wanted it to have the look of authority about it. I wanted to be able to wear it with my Hussar’s jacket and with my Rocketeers uniform and I also wanted it to look fab-u-lous!
So, I went back to those images of the real military Czapkas from the Napoleonic and Victorian age. Polish, Austo-Hungarian, French and British examples. Boy did those guys love their bling!
(See above)
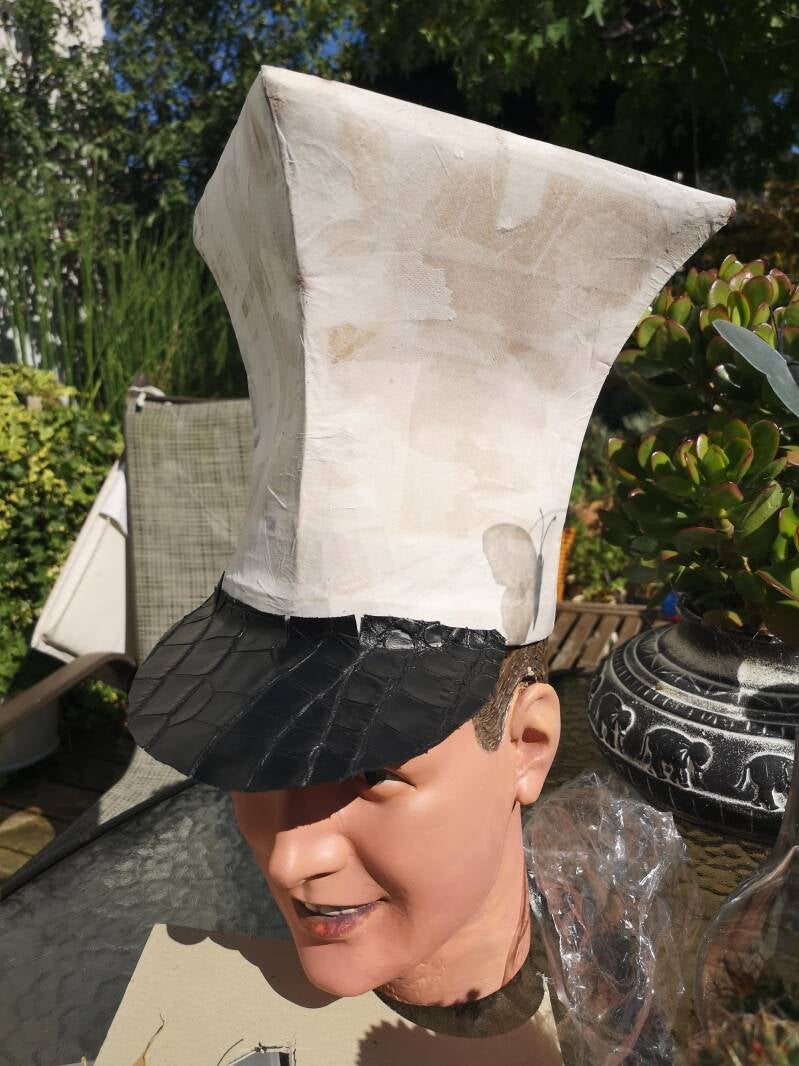
Because I'm a maker, I have lots of stuff around the house including a lot of leather offcuts. I found a few small pieces of leather with a reptile print on it and cut out the cover for the peak. I would also use some of it to make a hat band later.


Un-thinned PVA does the job of gluing the leather nicely to the paper mâché surface. Be generous with the glue.
Taking inspiration from the originals I decided to cover the hat partly with leather (lower) and partly with fabric (upper). I have a couple of small hides of goat skin and using the card template I cut before, I cut out four sections, and the underside of the peak, and glued them on.


Knowing the inside sweatband was going to get a lot of use, I chose to glue a band of felt inside. I used UHU glue and gave it a generous smear. It’s waterproof and holds the felt well.

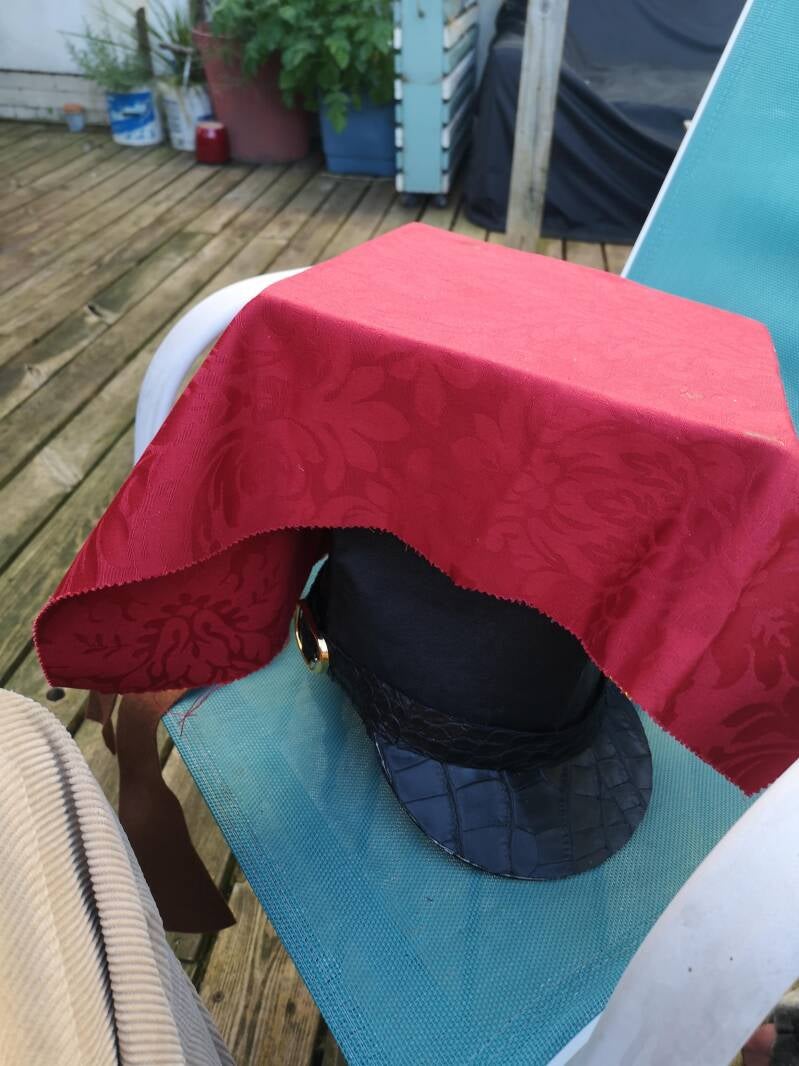
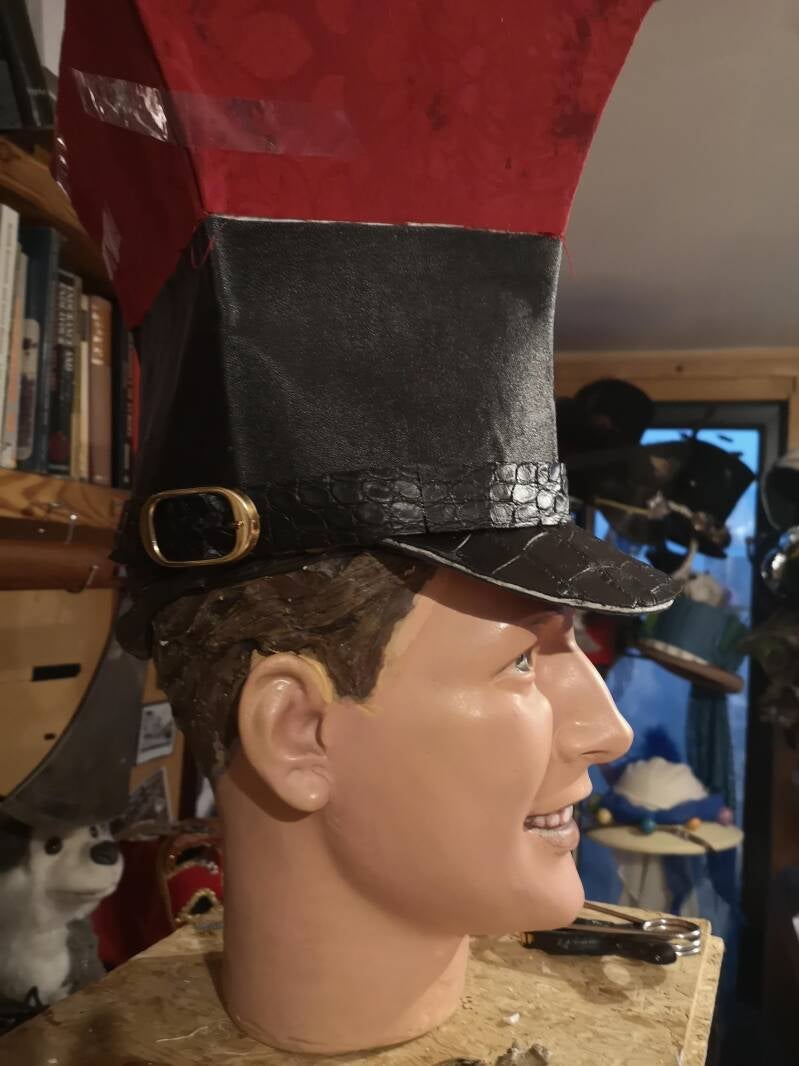
Now for the fabric. I decided that as the Czapka was going to be part of my ‘dress uniform’ for both the Hussars’ jacket and the Rocketeers it should be red and black. Rooting about the house I found a piece of red cloth with a nice pattern on it. Not quite big enough to cover the whole top area and side halves without cutting it, but excellent material, heavy and good quality.
I used the PVA to stick this to the hat and trimmed it to fit. Don’t be too generous!! My mistake was putting too much glue on certain areas and it not only took an age to dry it marked the fabric on the top a little.
After trimming to fit, I folded corner edges and glued them with fabric glue. I tried to match up the short side with some off-cuts as best as I could.

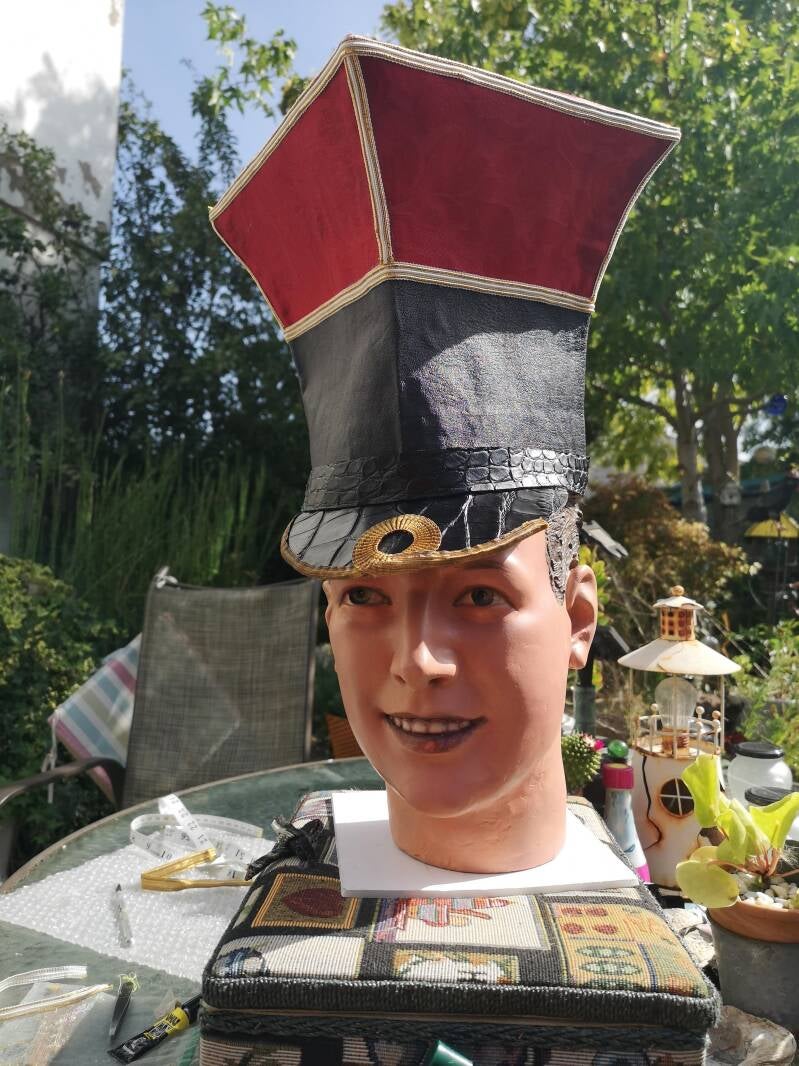
Looking back over the original images I chose to put some braiding around the edge where the leather and fabric meet, around the top and over the seams of the fabric. I used fabric glue for this as it dries very fast and sticks well.
The real military metal braiding used for the cap edge has been sitting around my house for years. It’s wire and tough and I used extra strong UHU glue to stick it into place.

All that in two days.
Onwards
And that’s where I had to stop, as now I needed to buy items to finish the decorating. Which we will look at in a moment.
This project was to see how far I could get using junk and stuff I already had around the house, without buying anything new. I think the result speaks for itself.
Firstly, though let’s look at the materials I used and probably you may have most of these around the house.
I have a lot of stuff left over from past projects and resources I have collected. I get a lot of things from Gloucester’s scrap store and I love to reuse things.
The cardboard was reused from Amazon card envelopes. This means no one can kick it and say it was theirs because you can still see the postage labels on some of them.
The foam art board was an offcut from a project years ago.
The masking tape and the framer’s tape were out of my workbox. As was the UHU. The Fabric glue out of my sewing box, and the big bottle of PVA I brought several months ago from the scrape store. I did use some epoxy glue that I had in my glue box. You could do 90% of the sticking using PVA and masking tape.
The teabag paper for the paper mâché was left over from the Westgate project, but you could use good quality paper towels or the brown packing paper you get in Amazon boxes. I laminate the areas with several layers, especially the seams and joints. The more layers the stronger it becomes.
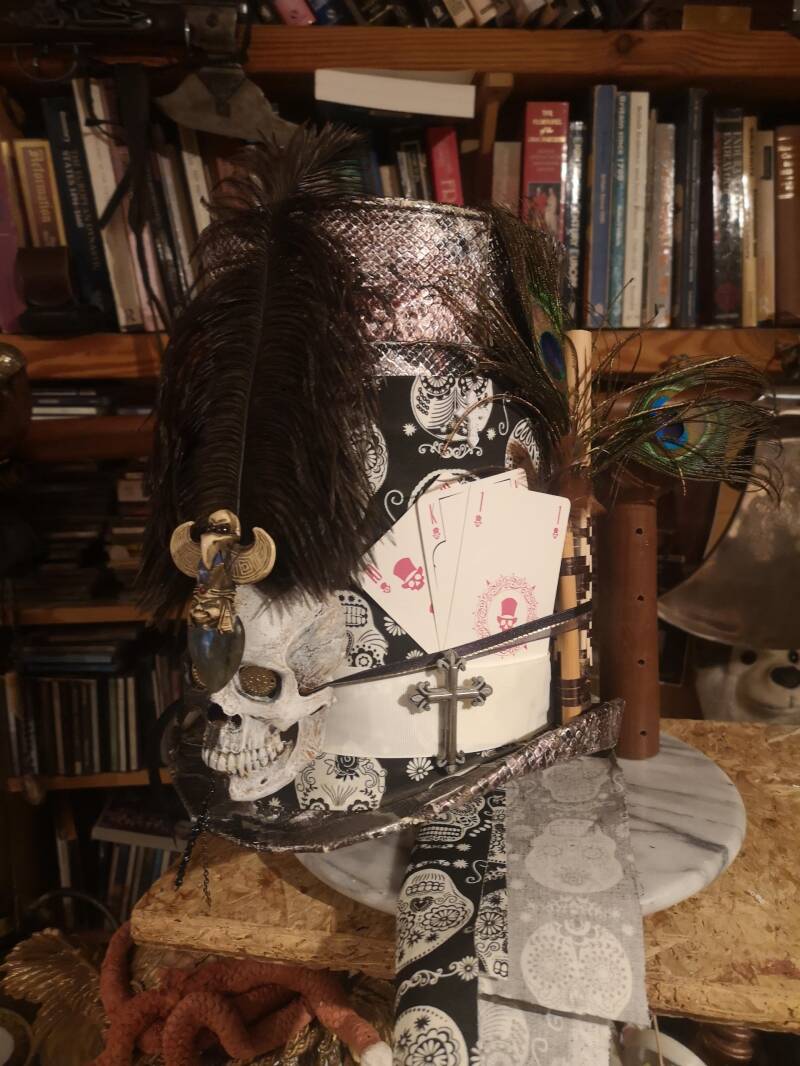
The goat skin leather I brought at a bargain bucket price at Tewksbury Medieval Festival before the lockdowns. The reptile print leather off-cuts or off-cuts came from the Gloucester Scrap Store years ago. You could use leather from an old coat or sofa. I made a peaked cap once out of an old leather satchel and A Voodoo inspired top hat out of an old faux snakeskin handbag I found on a bin.

I have no idea where the red fabric came from. Probably one of the pieces I pick up occasionally from the scrap store. You could use almost any fabric, but the heavier it is the better. A bit of old curtain material would be good.
The felt came from the scrape store too. I have lots of bits of felt around the house. Mostly green, I use it for all sorts of things. You’ve probably got some somewhere, if not use a bit of leather, swede side up for the sweatband.
The buckle on the hat band is one left over from a previous project years ago. You probably have an odd buckle about somewhere. I’m about to throw out some old wellies, but first I’ll remove and keep the buckles on them for my box.
The fabric braids came out of my box of braids and shiny things. I’ve collected this stuff for decades. It might have come from the scrape store, but I don’t know, it’s been sitting in that box for years. And I had just enough to do the job.
The gold metal braiding used for the cap edge; I think someone gave it to me a long time ago. I’ve used most of it but this was one of the last pieces sitting in my sewing box.
It remains surprisingly light, and strong, and Nikki said it’s surprisingly comfortable.
That’s it; the basics of a Czapka military hat built from the resources and junk around my house. Oh, and go join your local Scrape Store project, it’s better than Hobbycraft and it will save you a hell of a lot of money.
Go on, have a go.

Part two; Decorations.
This challenge is to decorate the Czapka to a level equal to the originals without spending too much money. I’m going to try to use as much stuff that I already have as possible.
- I need a big badge for the front.
- I need some swagged braid.
- I need something to make into a reasonable looking chin strap and the fixings to attach the chin strap to the temple sides.
- I also need a ‘hackle’ or feathers for the side.
- And a side badge, and maybe so other bling to jazz it up.
- Also, it’s got to shout Steampunk not Re-enactment.
- I have to keep the costs down.
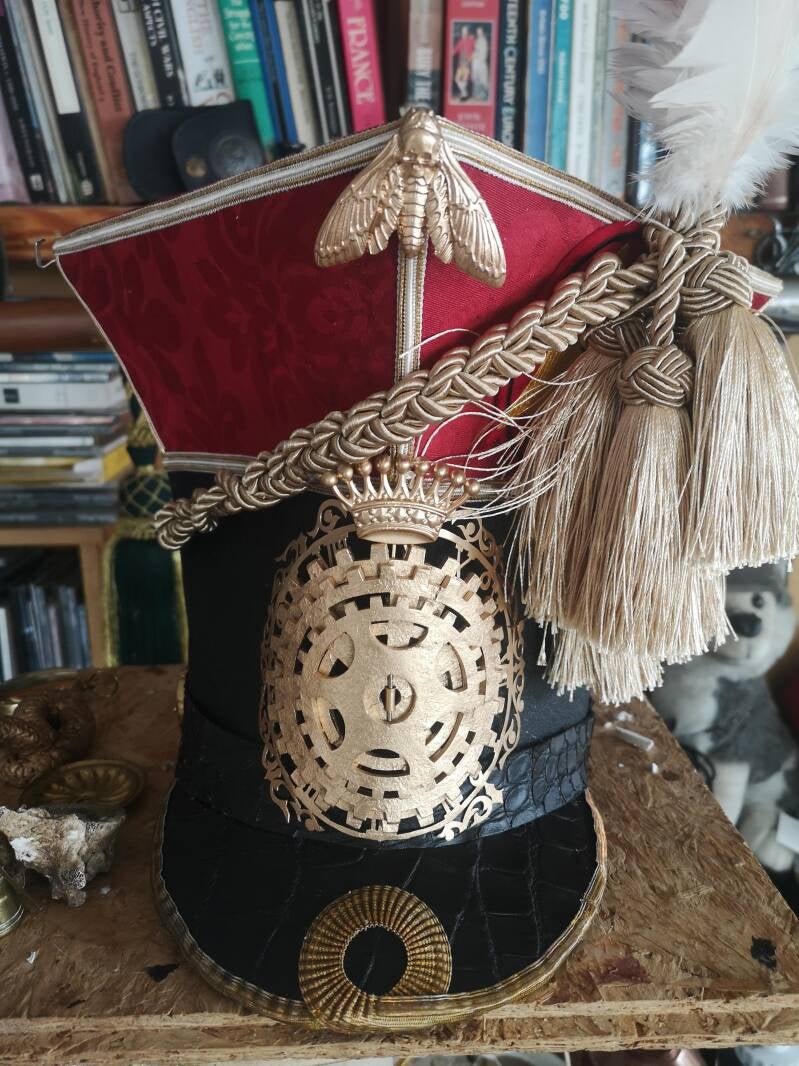
The Badge.
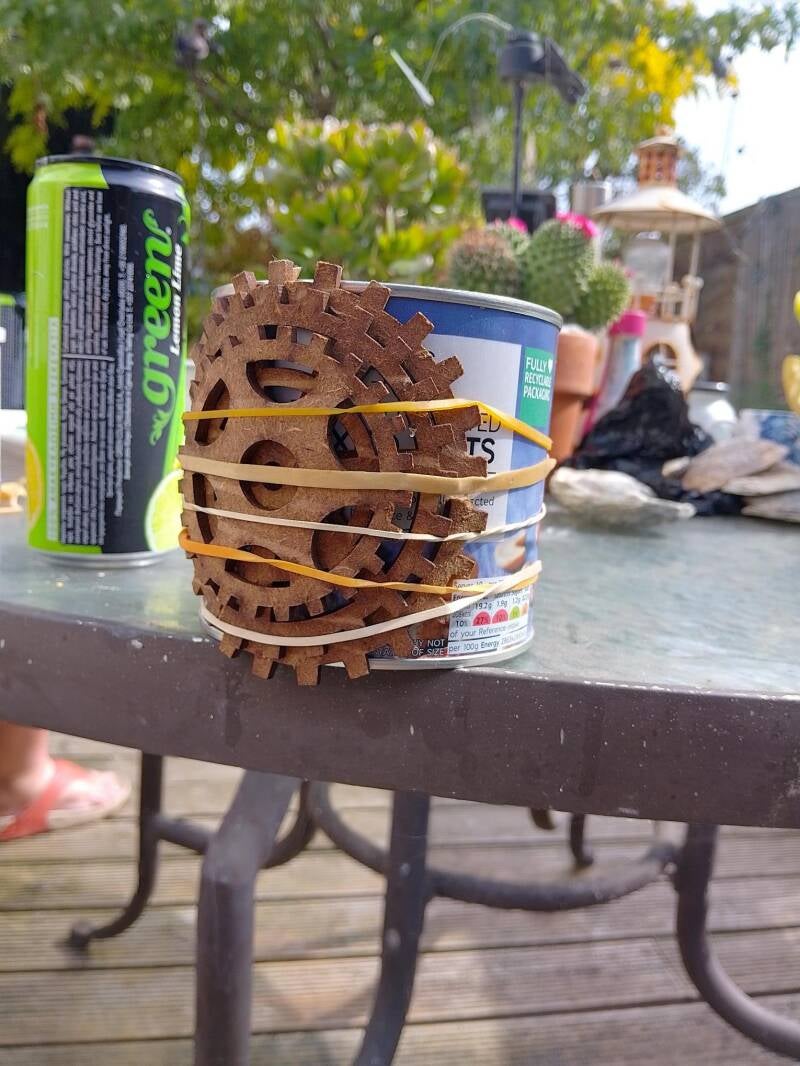
The badge was the first thing I started and ended up, because of postage delays, the last thing I completed. the basis is an old fretworked clock face I had laying around for decades. Then I discovered that I still had some large MDF laser cut cogs left over from an abandoned project which looked pretty good with the clock face. But they needed bending into shape. The first one I tried to bend broke. I discovered that quickly immersing the cogs in boiling water and then bending them around a can to let them dry worked perfectly. The crown was something I swapped for some odds and ends with a fellow creative some time ago.
But this was to have the look of a Lancer, and the 17th's famous motto is 'Death or Glory,' with the skull and cross bones badge. So I sourced a skull and crossbones on line. It's a car badge from Amazon.
I assembled the whole thing and gave it several layers of gold spray paint. I admit to buying a new can of expensive spray paint as I wanted this to look really good.
Total spent; £8 plus some paint.


The swagged braid.
I brought two relativity inexpensive gold curtain tie-backs with nice tassels on them, and braided the cords together to make the swag. I did have some issues as I have never done this before but to get the cords long enough I had to cut and glue the cord ends together. One thing I learnt was tape the cord at the point you are going to cut very tightly. And pop some super glue on it before you cut.
Total spent; £7.

Chin Strap.
I thought long and hard about this. As real military chin straps can be very expensive. And most available from re-enactor suppliers are not what I needed. So I looked at Lady's Fashion Belts on the internet. This one cot about £5 from Amazon. Though I had to shorten it and backed it with leather. The strap has two fittings either side of he temple, these lion headed pieces were draw-pulls for £1.75 each from Temu, and they are ironically look exactly like the lion heads on real Czapkas. The hook to hold the chin strap on the right upper side was just a hook I made from some random bits I had from the scrap store.
Total spent on chinstrap and fittings; £8.50


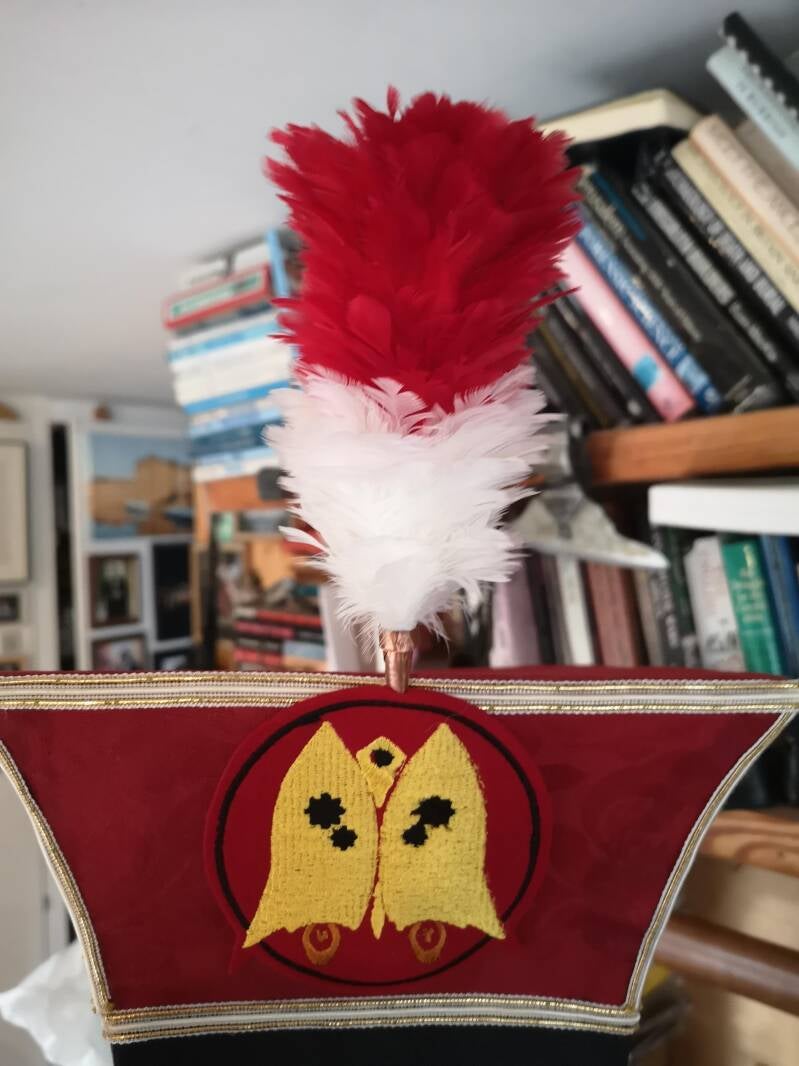
The Hackle and Badge.
This is a standard British Army issue hackle I brought on line for about £7.
The Badge is our Steampunk Rocketeers regimental badge made by Beryl Furey-King Thimblebee Millinery. I glued this down heavily so I could use it to support the hackle.
Total spent; £7
Other bits.
The Deaths Head Moth is a broach from Amazon for about £11. Sprayed gold.
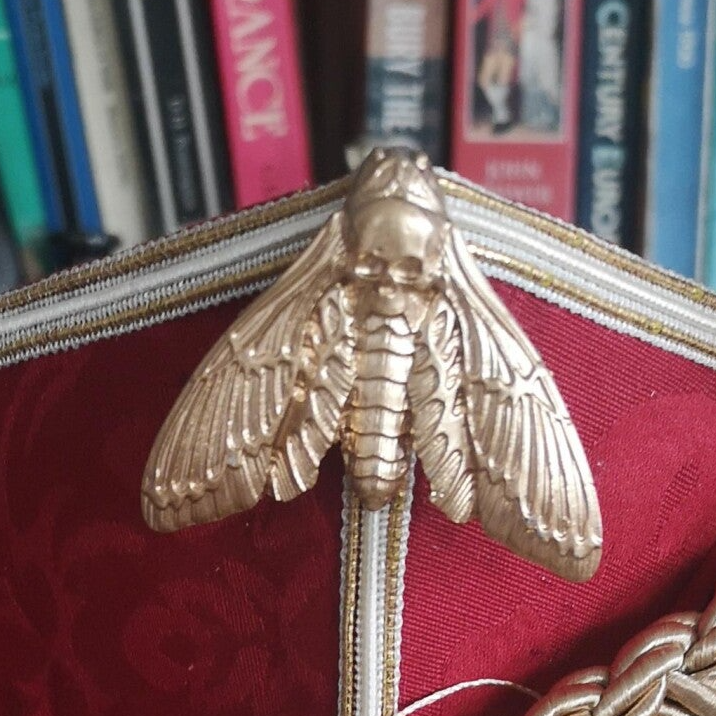
Total spent on bling and furnishings;
£41.50
(I did not include the paint as I already had gold paint I could have used)
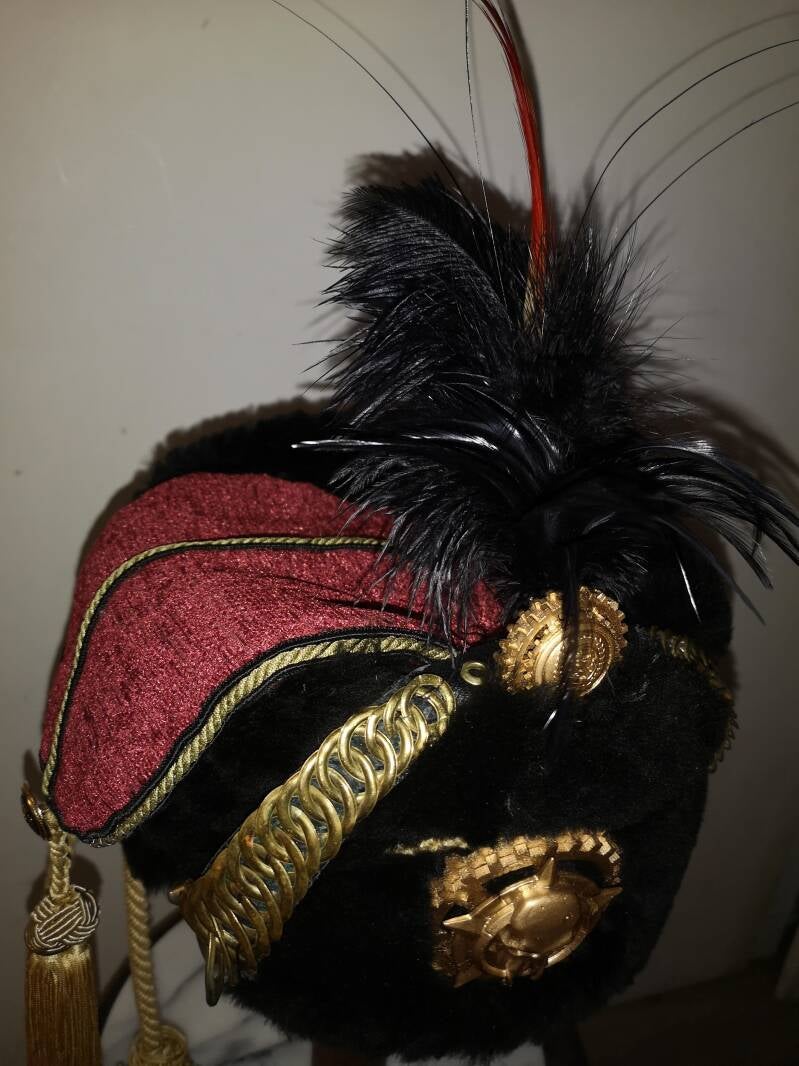
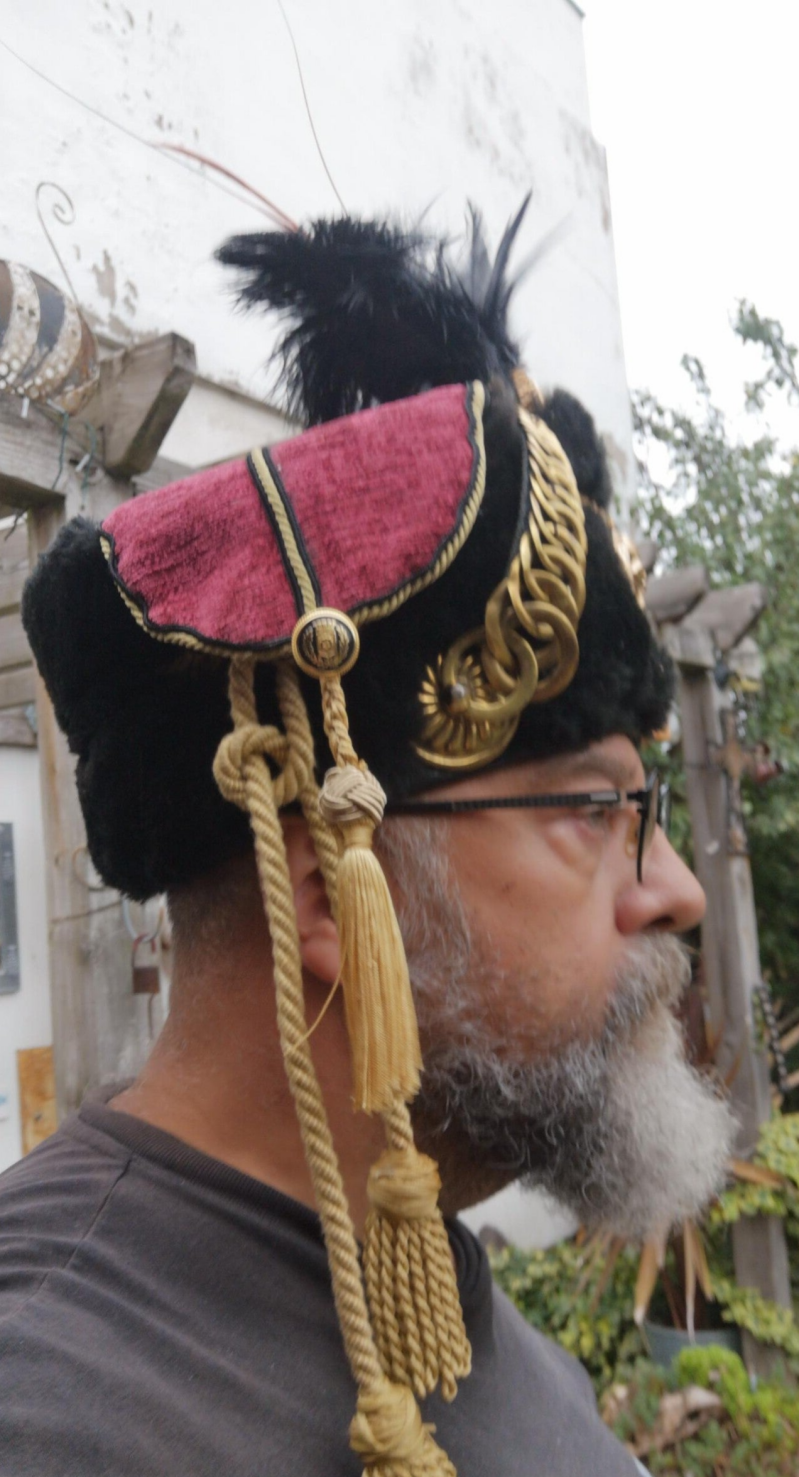
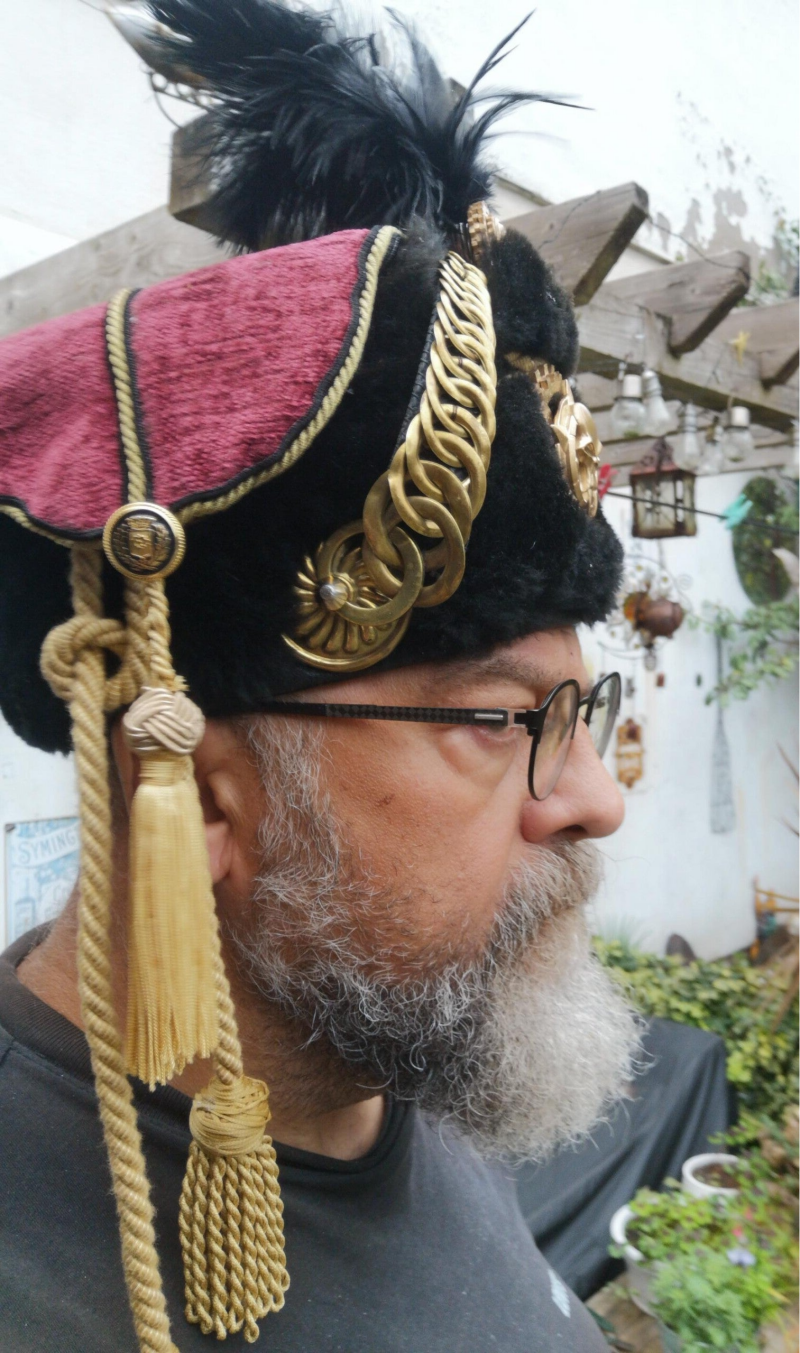
Well that's it...
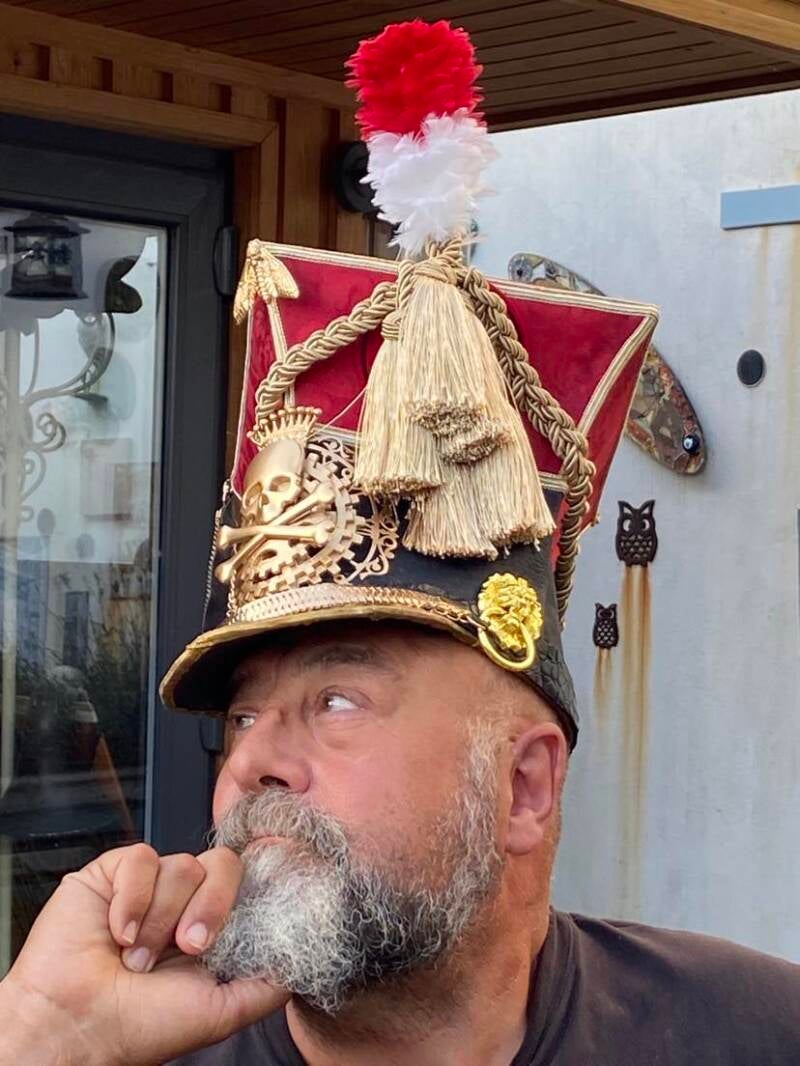
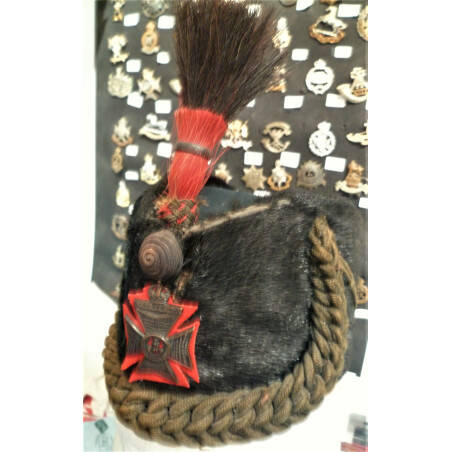
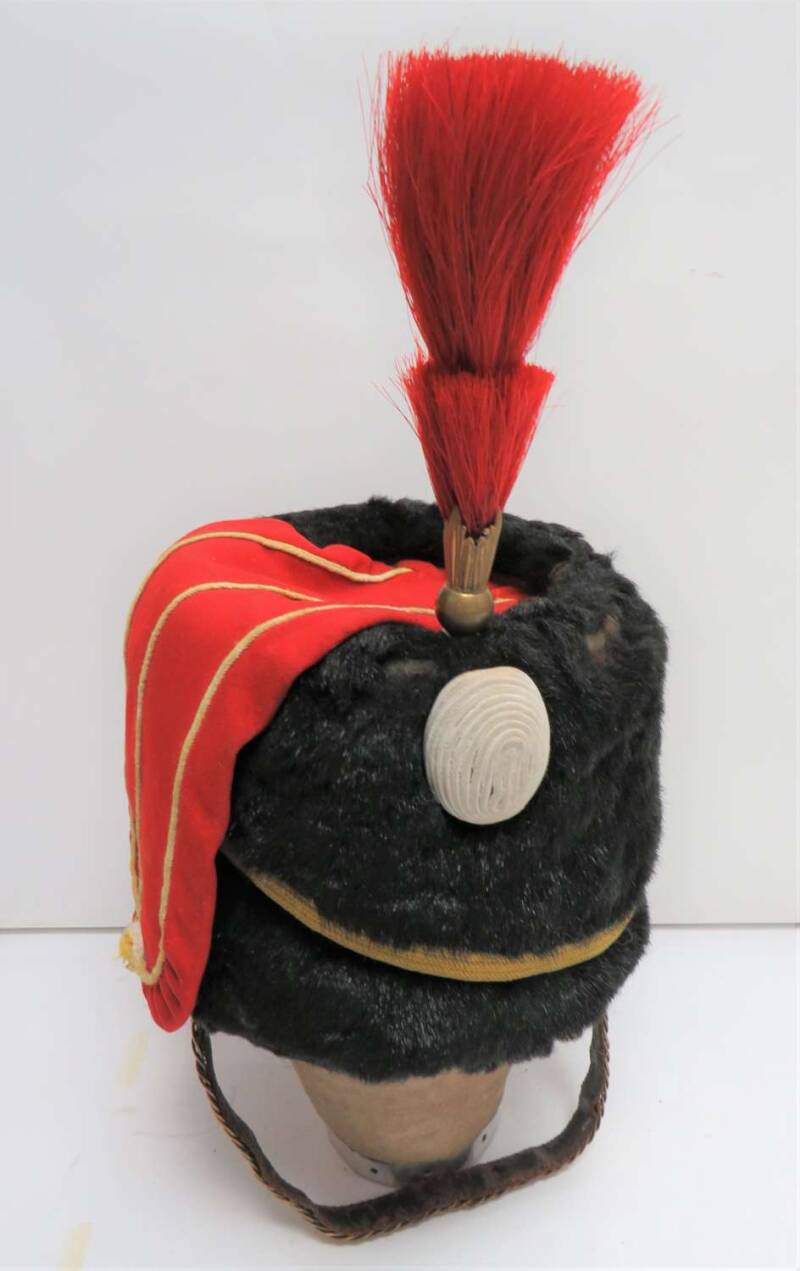
The finished Steampunk Rocketeer Lancers' Czapka.


Making the Steampunked Huszár’s Csákó
Hat Project 2
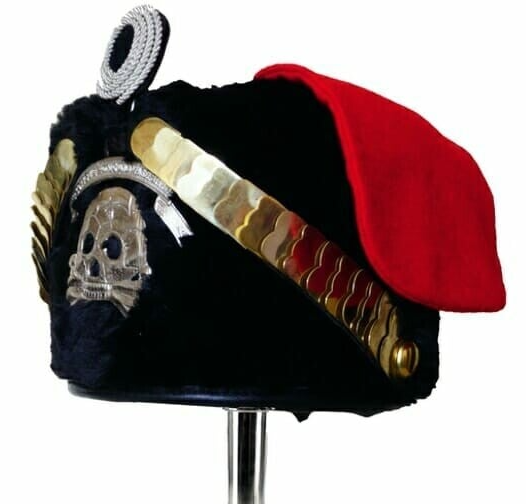
Making a Hussar’s prémes csákó (fur shako) or kucsma.
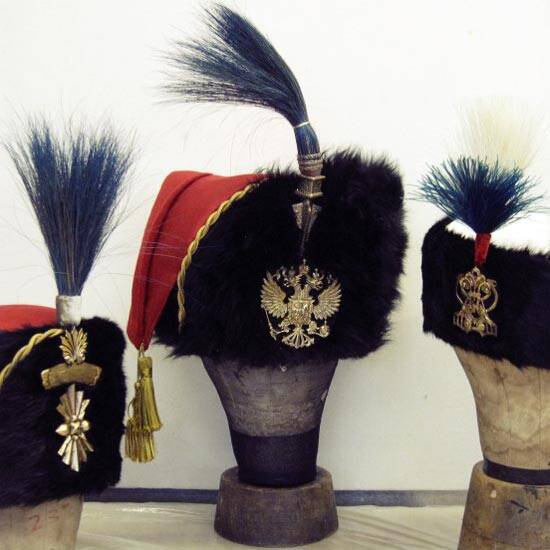
The classic Hussar’s fur shako or busby.

Well I was happy with the Lancer’s Czapka and decided that if I had a Hussar’s Pelisse I might as well go ahead and try to make a proper Hussar’s hat to go with it.

Research… do your research before you plunge right into this kind of project. You have to decide what you want it to look like and a find specific style and type of hat, so you have a clear idea of what you are making. If you don’t then it’s likely to get away from you and end up in that pile of discarded half-finished projects.
Through research into these hats, you learn an awful lot of interesting stuff, like strange names and history.
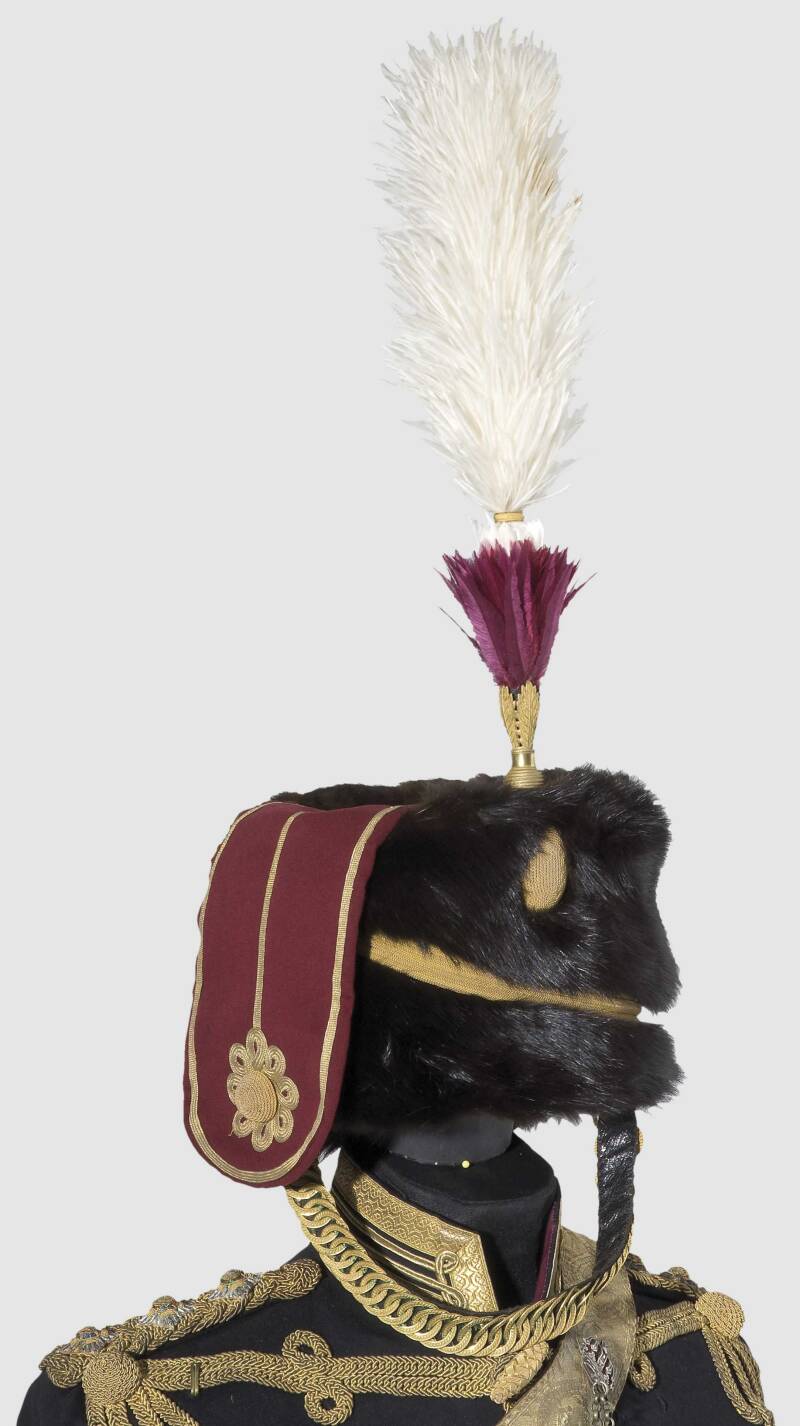

Busby is the English name for the Hungarian prémes csákó (fur shako) or kucsma, a military head-dress made of fur, originally worn by Hungarian Hussars.
In its original Hungarian form, the busby was a cylindrical fur cap, having a bag of coloured cloth hanging from the top. This bag could be filled with sand and the end attached to the right shoulder as a defence against sabre cuts.
It’s a fur hat, with a bag on top. There are numerous versions of it – I decided to stick with the British styles rather than the continental ones. Mainly because of the materials I had available at home.
Construction.
Again I started exactly like with the Czapka. The ideal material was another couple of Amazon cardboard envelopes.
I used the trimmed-off folded-over edges to make the hat band exactly how I made it for the Czapka.

The thing here though was that I did not have to cut the card into panels as the form was a shortened tube. How short though was the question. I spent a long time looking at the pictures of the hats on the internet. I tried 6” originally but that made for a very tall busby, you should go for personal taste. I plumped for 4” which with decorations etc would not be too high. I folded the excess in at the top to add strength.
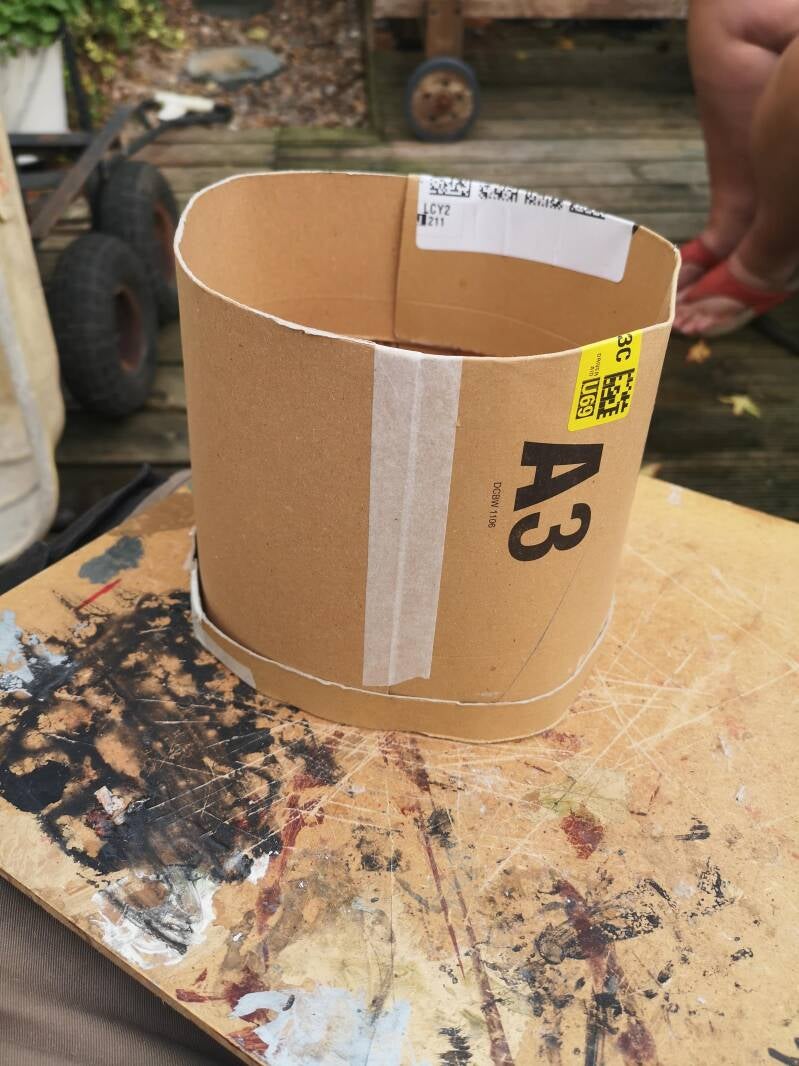

I taped and PVAed it together and using a cheap plastic top hat, wrapped in clingfilm, as a form I allowed it to dry. Using something, a manakin’s head or another hat or whatever is available, allows the damp cardboard to meld and form into the shape you want it.
Once dry the card had taken on the exact shape and size I wanted, and I could use it to make out the shape of the crown of the Csákó.
I cut this out of some thicker card I had, allowing for tabs around it. I glued these generously and slid the crown in from the bottom up. I used a block of balsa, anything will do, to make sure the crown was about 1” from the top lip of the sides and level.
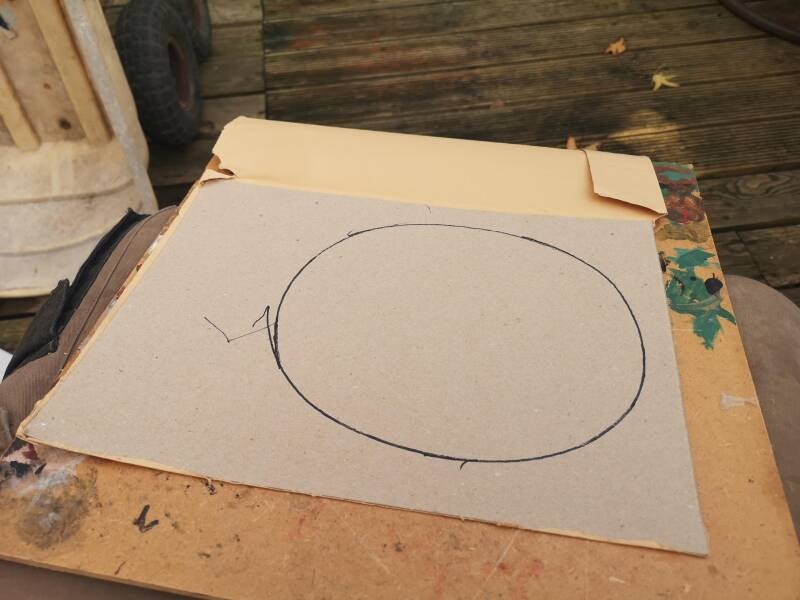

Once dry, I marked out and cut another crown-shaped piece of card (no tabs), this time from some scrap art foam card I found in the loft – this was inserted from the top – remember to be generous with the PVA.


Once the whole thing was thoroughly dry I had to make it strong. I laminated on a couple of layers of teabag paper, you could use separated layers of a strong kitchen towel if you can’t get the teabag paper. This helps pull everything together. Apply with a thinned PVA and be generous.
Once those layers were dry, I layered over it at least two layers of brown paper.
I use Amazon packing paper, especially the slightly grey stuff. I have a lot of it hanging about, makes great wrapping paper as well, I never need to buy brown paper from the shops. I find it I tear it up randomly into small pieces and soak them in the thinned PVA the paper melds well in a rigid cohesive form. Remember to do the inside as well.


As the hat dried again in the sunshine. I made the fitting for the crest or top badge of the shako. I knew this would take a lot of stress on it so I mocked up a pin using a piece of off-cut brass Dave Feasey gave me and a couple MDF cogs made by Andy Dingley and formed a card around it. I taped it into place and papier-mâché over it. Leaving it to dry.


Using more of the left-over goat leather from the Czapka, I cut and glued into place a hat band. I used UHU for this as it’s waterproof and tough. I had already lined the hat with some old black fabric I had left over from cutting up several gilets to make a Krampus costume. The UHUed leather band would hold the lining in place to. Be generous with the UHU and do it outside because of the fumes.


I use clothes pegs mainly to hold things in place, but you can usually get a small set of black plastic clamps from your local pound shop that are really good for this kind of work.

I have lots of bits of old fur fabric around the house from other projects. I made a Krampus costume out of several faux fur gilets that had had some exceedingly good quality black faux fur, enough to cover the Csákó.
I glued this on with an un-thinned waterproof PVA. Folding it over the top edge and holding everything in place with pegs. be careful as the fur is a magnet for odd splodges of PVA, have a wet cloth at the ready to clean up.
You may have to trim it to look right. I left the little tufty bit on the fur fabric as I felt it made it look more real.
You do not be too focused on making it look exactly like a military one, this is Steampunk, if you want cogs and tufty bits; go for it! It’s your Steampunk interpretation of a Hassar's Fur Csákó.


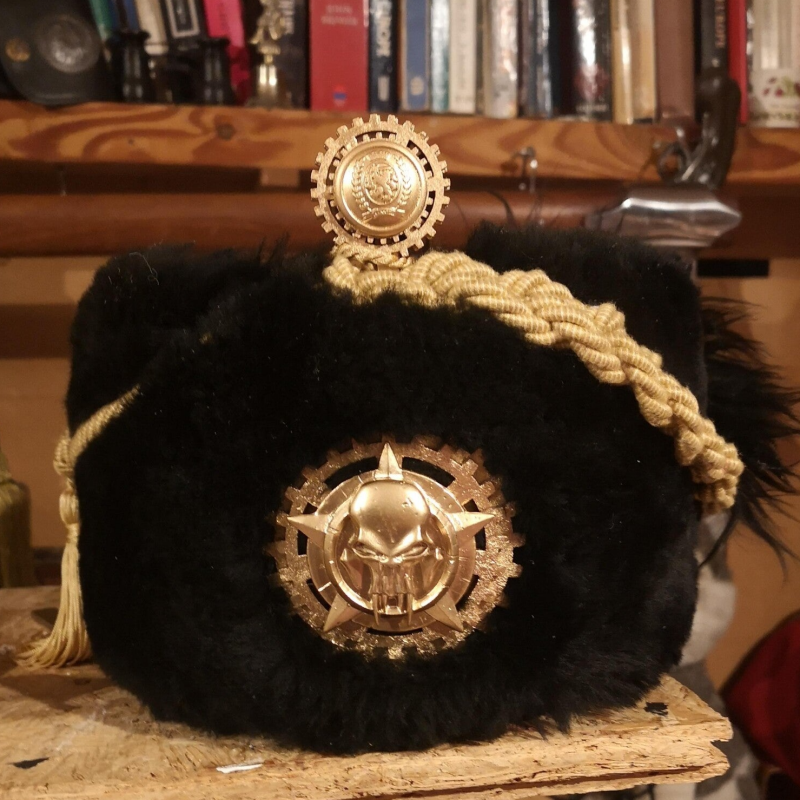
The Bling.
Hussars and Steampunks love their bling.
The crest was made by gluing a military-style button to the MDF cogs and spraying it gold.
The Death’s Head badge was made by gluing a couple of large MDF cogs, from the same lot I had used for the Czapka, together and adding a badge I have had for years.
It was from some American computer game that didn’t get off the ground. Glued together and sprayed gold.
I remember now I haven’t told you how to attach the badges to the hats!
Of course you can glue them but I have some medium thick copper sheet; it was originally part of an old hunting horn I cannibalised for parts. I cut the sheet into thin strips and made a split pin to hold the badges in place. The split pin was anchored at the back of the badge and passed through the fabric of the hats to hold them in place firmly.

The Bag.
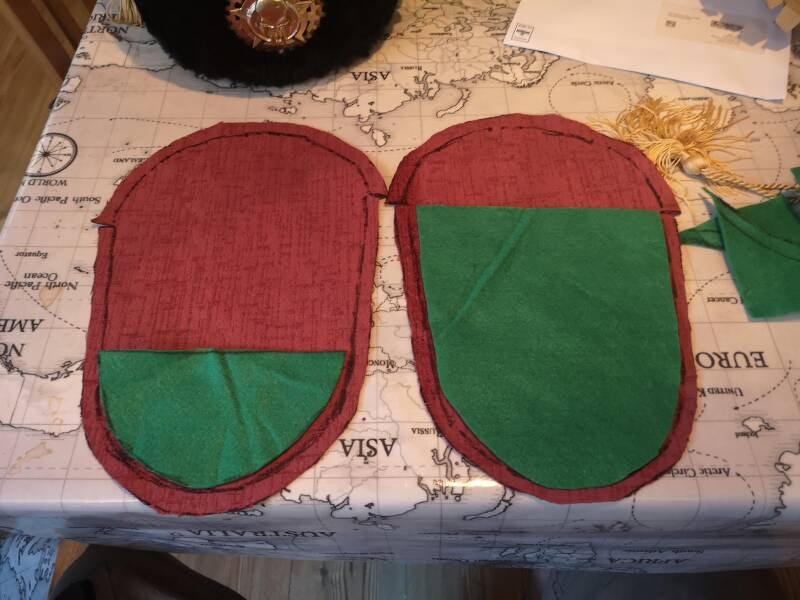
Now this was going to cause me some consternation. It would involve sewing. I first made a paper pattern in the shape of the bag and cut another flat piece of card to make the base. The “bag” is folded so it can flop down either side of the hat, mostly worn on the right side, make sure it’s a good length.
This was all trial and error. So, make sure the paper pattern works before you cut any fabric!


I searched the house for some fabric that I liked and found some in the attic. A nice deep red, with some weight to it. For added weight and body I lined it with some scrap green felt. I cut and sewed the bag together and then glued the mouth edges to the card I had cut, and then I glued the whole bag onto the crown of the Csákó. Remember to mark on the inside not the out side and sew inside out and then “bag out” so the stitches are on the inside.


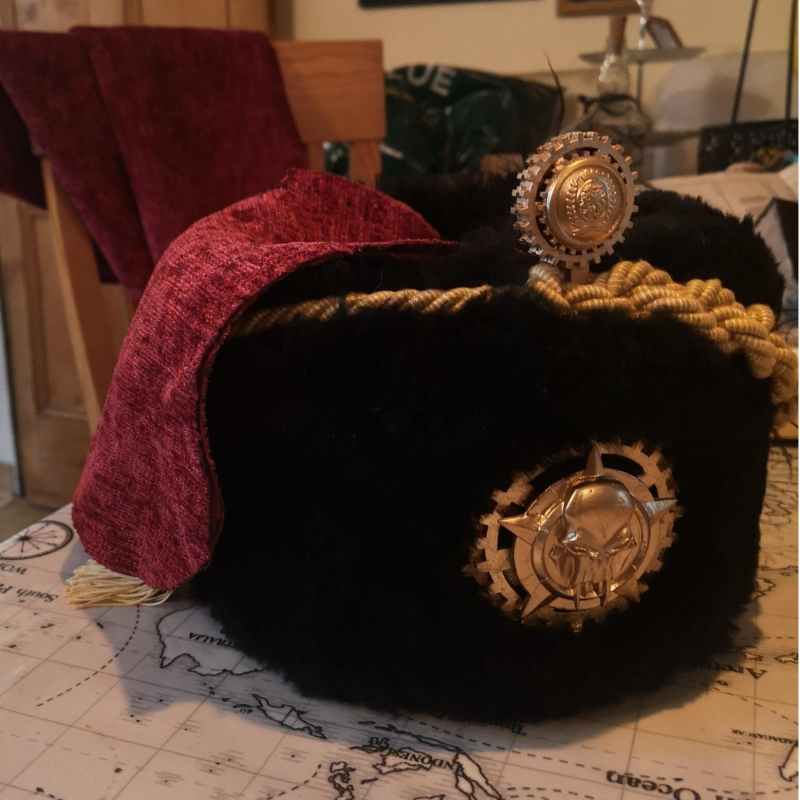
I edged the bag with some braiding that I had in my sewing box, originally from the Scrap Store. And a tassel that I had from another project. I later added a button to give it extra weight.

The golden swag braiding was woven from a length I picked up at the scrap store. However, I was not happy with it, and eventually, after revisiting my research I changed it.
That was it. The basic hat was built for no cost.
Decorations.
The hat would need a chin strap.
Fittings.
Hackle.
Chin strap.
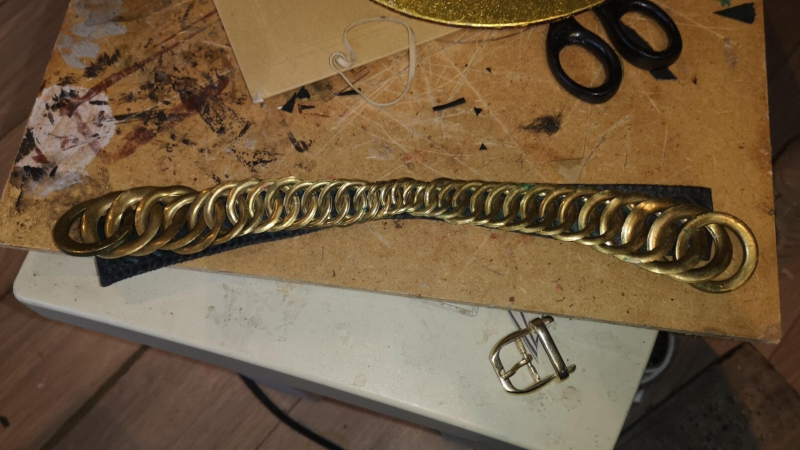

I decided to go all out and try to buy a real Original British Army Helmet Brass Chin Scale chin strap. Excellent but the measurements stated were off and it needed a bit of repair and cleaning. I had to cut it and sew it to a new leather backing so I could lengthen it and add a small buckle out of my buckle box. £10 on eBay.
Helmet mounting rosettes.
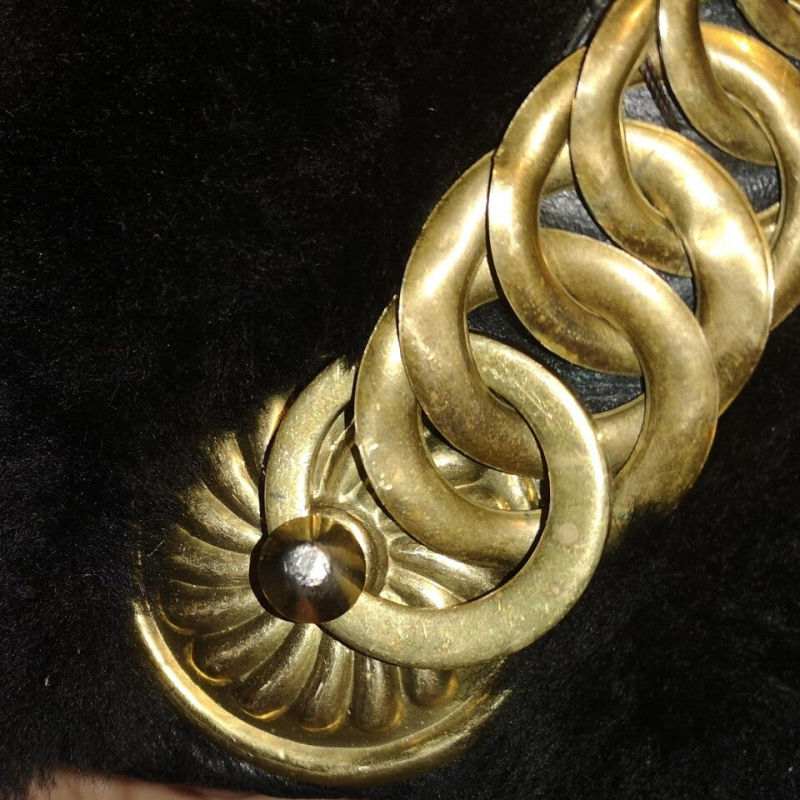
The escutcheons, or helmet mounting chinscale rosettes, on the sides were a costly mistake. At £10 from eBay they were not as good as the draw pulls I brought from Temu a few days later for £1.75 each (see above). I used the copper split pin method of attaching them.
The Hackle.

The black father Hackle I brought from the scape store about a year ago and had in one of my other hats.
Total spend; £20


Create Your Own Website With Webador